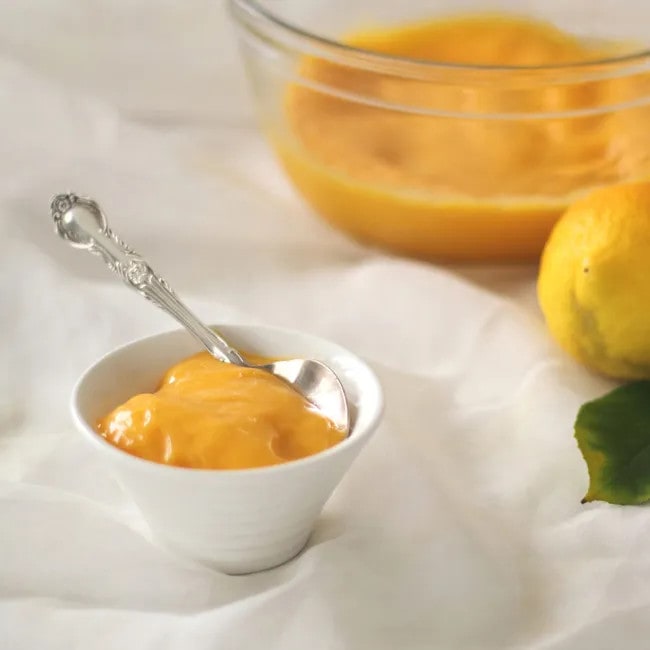
Lemon Curd is, quite simply, a gift from the gods! It knows when to dress up and when to dress down. You can find it added to any number of baked goods and desserts (such as Tangy Lemon Bundt Cake, Lemon Meringue Tarts and Creamy Lemon Curd Mousse), or simply slathered over hot toast or crumpets. And why waste your money on store-bought curd when you can so easily make your own lemony deliciousness for a fraction of the cost.
Now, below you are going to find two recipes using exactly the same ingredients (and quantities) but prepared quite differently. The first recipe is the original one I put on this site, courtesy of Alton Brown and sourced from Food Network. It is the classic method where the butter is added into the lemon custard right at the end. The second version beneath it is based on another method whereby the butter and sugar are creamed first.
Why am I offering two versions? Simply, because I was curious about whether one method was better than the other. So, I thought I’d try both and offer both. I used exactly the same ingredients and quantities so that it was a fair comparison. The result? Actually, they were pretty much identical, it seemed to me. The second version just used more dishes!
I’ve made curd a number of times now and have learned a thing or two. Once or twice, the curd hasn’t thickened enough upon cooling – in that it is still somewhat pourable. I have discovered that the main problem has been that I haven’t cooked it long enough. Even when I’ve used a thermometer and taken it to the required temperature, it hasn’t always worked. Now, I rely much more on how it looks and feels. It should thicken a lot just before it’s ready (i.e. get harder to whisk) and it should get to the ‘ribbon stage’ – where, if you hold your whisk up above the mixture, the curd should fall into ribbon shapes and hold briefly on the mixture before disappearing. Finally, here’s a good tip I learned off other cooks – if you find your curd hasn’t thickened properly on cooling, put it right back on the heat and start again – I’ve done it, and it works!
Just to note: Just in case you were wondering why my lemon curd is so yellow, our New Zealand egg yolks seem to be more yellow than in some other countries – I also use organic eggs, so they actually border on orange!

LEMON CURD (Version 1)
Ingredients
- 5 egg yolks
- 1 cup sugar
- Pinch salt
- 4 lemons , zested and juiced (to make 1/3 cup juice)
- 1 stick butter (113g), diced
Instructions
- Add enough water to a medium saucepan to come about 1-2 inches up the side. Bring to a simmer over medium-high heat.
- Meanwhile, combine egg yolks, sugar and salt in a medium size bowl and whisk until smooth (about a minute). Add juice and zest to egg mixture and whisk until smooth.
- Once water reaches a simmer, reduce heat to medium-low and place bowl on top of saucepan (bowl should be large enough to fit on top of the saucepan without touching the water). Whisk until the mixture is thickened to the point that, when you hold the whisk above the mixture, the curd should fall into a ribbon shape and briefly hold its shape on top of the mixture before disappearing. Depending on the stove, this will take about 15-20 minutes (if you find that it’s not thickening at all, you may want to edge up the heat a little, but go easy!). If using a thermometer, the mixture should reach 170°F or 76°C.
- Remove from heat and stir in butter, a piece at a time, allowing each addition to melt before adding the next. Pour the mixture into a clean container, cover by laying a layer of plastic wrap directly on the surface of the curd, and refrigerate. The curd will thicken markedly over the next several hours (I always make mine at least a day ahead so that it’s beautifully thick and the flavors nicely amalgamated). You can refrigerate for at least a week.
Nutrition
LEMON CURD (Version 2)
Ingredients
- 5 egg yolks
- 1 cup sugar
- Pinch salt
- 4 lemons, zested and juiced (to make 1/3 cup juice)
- 1 stick butter (113g), diced (room temperature)
Instructions
- Put a small saucepan on the stove and add 1-2 inches water into it. Turn the heat onto medium-high until the water comes to a low simmer. Then turn the heat down to medium-low.
- In a medium sized stainless steel or Pyrex mixing bowl, cream the butter, sugar and salt until creamy yellow and fluffy. Add the eggs yolks, one at a time, and beat until combined. Then add the lemon juice and zest and beat till it’s combined. At this stage, the mixture will look completely curdled – don’t worry about that at all. Once it heats up, it will smooth out beautifully.
- Put the bowl over the saucepan of water and, whisking constantly, cook over low heat until thickened. Whisk until the mixture is thickened to the point that, when you hold the whisk above the mixture, the curd should fall into a ribbon shape and briefly hold its shape on top of the mixture before disappearing. If you have a thermometer, the temperature should reach 170°F (about 15-20 minutes).
- Remove the bowl from the heat, pop some plastic wrap directly over the surface of the curd, allow it to cool, and then refrigerate. It should keep in the fridge for at least a week.


Why isn’t the zest removed? The curd will not be smooth if the zest is left in.
Not sure why – it wasn’t my recipe. I loved the results and found it beautifully smooth, but if you don’t like the sound of it, just put the mixture through a sieve.
You saved my life (curd)!! I had overcooked it and was so sure i’ll have to make it in. But I tried your trick of whipping it with boiled water and it’s as good as new!!! Thank you!
Yay, great to hear!