In a ‘celebration’ of past Daring Cooks and Daring Bakers challenges, Lisa challenged all of us to search through the Daring Kitchen archives and pick any one we’d like! The REAL challenge was picking which delicious recipe(s) to try!
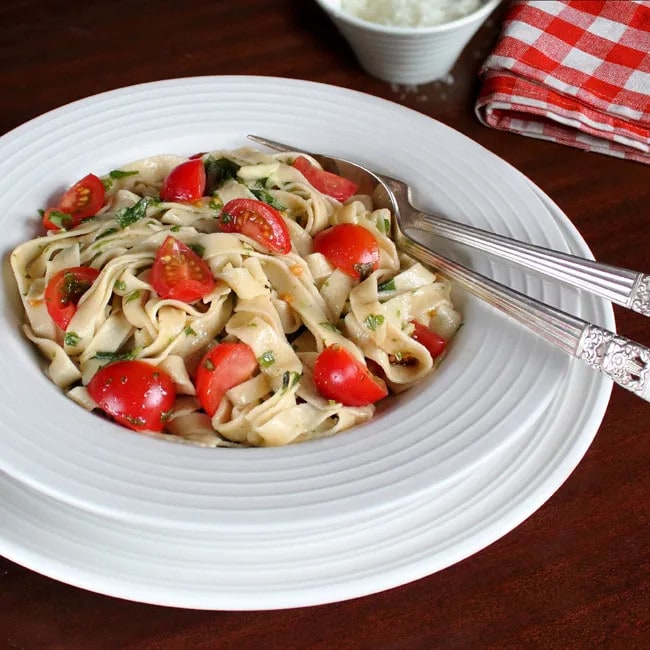
I had no problem finding a past challenge to undertake. I recently bought a non-motorized pasta maker, which was half price in a sale, but had no idea how to use it so put it away in the cupboard (as you do!). When this challenge came up, I immediately looked to see if there was a pasta challenge, and indeed there was – the ‘My Noodle Hand’ challenge in July 2011. I made the Egg Fettuccine along with the Aglio, Olio, Peperoncino e Basilico (garlic, oil, tomato and basil) sauce. I was surprised at how easy it all was, from making the dough, to rolling it out, to cooking it, and then.. oh the taste! Divine! I haven’t been as excited by something I’ve cooked in ages!!
While these instructions are specifically tailored for those with a non-motorized pasta machine, you can do this by hand – here’s a helpful video to show you how.

EGG FETTUCCINE & TOMATO & BASIL SAUCE
Equipment
- 1 Pasta Roller
Ingredients
- 2 cups all-purpose (plain) flour
- 3 large eggs, beaten
- Water (as needed)
Instructions
- Sift the flour into a large mixing bowl.
- Push the flour out of the very center of the bowl, to make a ‘well’. Pour the beaten egg into the well.
- Slowly incorporate the flour into the egg by mixing a small amount of flour into the well at a time and mixing until incorporated. Start by mixing in flour around the perimeter of the egg, and gradually widening the mixing to include more and more flour. Mix until all of the egg is mixed into the flour.
- At this stage, use your hands to try to form a rough ball. If the dough is too dry, add a few drops of water and incorporate. Be careful to not add too much liquid – it‟s better to slowly add water as needed, as opposed to trying to add more flour to a sticky dough. My trick is to wet my fingers, instead of pouring water directly into the dough. This ensures a minimal amount of water is added, and is more evenly distributed.
- Knead the dough for a few minutes, until it is smooth.
- Roll the dough into a ball, cover with plastic wrap, and set aside to rest. It should be allowed to rest for at least 15 minutes, at most 2 hours. Take this time to set up your pasta roller, and/or to prepare the sauce.
- Divide dough into 6 equal pieces. Take one piece to start, and put the remaining back into the plastic wrap so that they don’t dry out.
- Form the piece of dough into a ball, and then flatten using the palm of your hand.
- Run this through the pasta roller at its widest setting.
- Place the dough horizontally on your work surface, and fold the long ends into the center, so that they meet. Press down on the edges to seal them. At this stage, you should have a rectangular shape.
- Run the dough through the pasta roller, open-side first, again at the widest setting.
- Repeat the sequence – putting the pasta through the widest setting, then folding the ends and running through again.
- Now run the dough through the roller two more times, again on the widest setting, without folding first. This will help to make the dough very smooth and elastic, for stretching.
- Now stretch the dough by running through the rollers, each time switching to a narrower setting. After the final setting, you should be able to see the outline of your hand through the dough. Note: The final setting depends on your machine. On my machine, (which has settings from 1-7) it started getting too thin and breaking at #2 setting, so I completed the process at #3 setting.
- Run the stretched dough through the fettuccine-sized cutters. Gently lay or hang your freshly cut pasta, and cover with a clean cloth so that it doesn’t dry out while you roll and cut the rest of your dough.
- Repeat the whole process for the remaining dough.
- Bring a large pot of water to a boil, gently drop in the freshly cut pasta, and cook for about 5 minutes or until just tender. Drain and toss with sauce and enjoy immediately!
- Note: The fresh fettuccine can be frozen before cooking. You may wish to lightly coat the pasta with a little bit of flour to prevent sticking. Gently tuck the pasta into a freezer safe bag and freeze flat. After cooking, the pasta may be refrigerated for up to two days.
Nutrition
AGLIO, OLIO, PEPERONCINO E BASILICO
Ingredients
- 1 clove of garlic
- ¼ tsp coarse sea salt plus more to taste
- 1 small bunch of basil
- ¼ tsp chili flakes
- ¼ cup extra virgin olive oil
- 1 cup quartered cherry tomatoes
- Freshly ground black pepper, to taste
- Freshly grated Parmigiano-Reggiano (Parmesan Cheese)
Instructions
- Using a mortar and pestle, mash the garlic with ¼ teaspoon of sea salt into a fine paste.
- Add a few basil leaves to the mortar and pestle at a time, and mash until softened (but not pureed). Do this until all of the basil is added. Add the chili flakes.
- If your mortar is not large enough, transfer the mixture to a bowl. Slowly mix in the olive oil. Add the salt to taste.
- Set the mixture aside for at least a half and hour to allow the flavors to mingle. When ready, gently toss with warm/hot pasta, adding more olive oil if needed. Add in the cherry tomatoes, and mix well. Add freshly ground pepper, to taste.
- Serve topped with Parmigiano-Reggiano, and a few more chili flakes.
Notes
Nutrition
Decorative Line Image Credit: Heading Flourish from Vector.me (by Andy)