When I offered to host this month’s Daring Kitchen cooking challenge, I thought it might be fun for members to make a raw, nutritious dessert, namely Vanilla & Raspberry ‘Cheesecakes’.
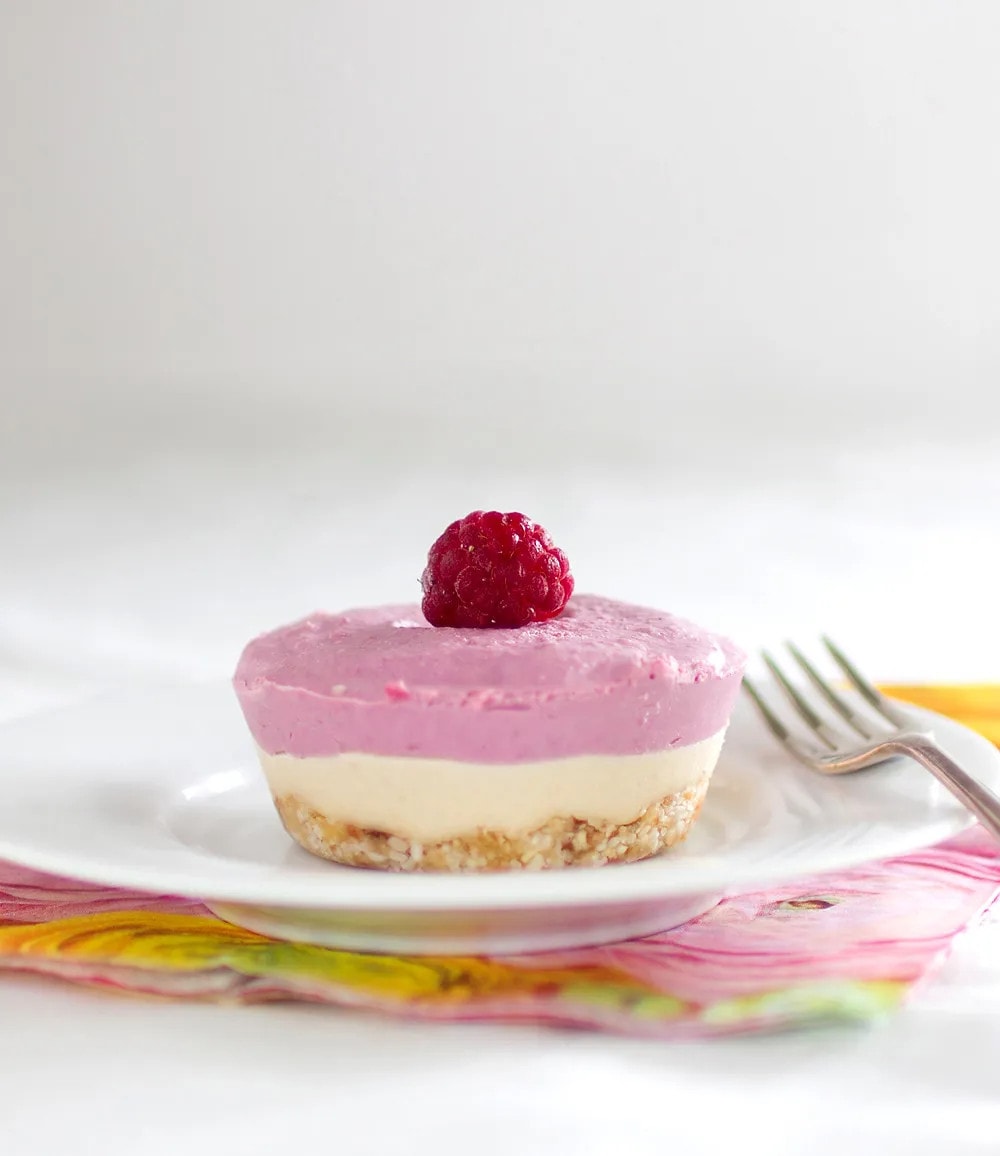
I reckoned that for people new to raw dessert making, this cheesecake was a great place to start. I had previously tried it out on my ‘absolutely not into health-foods’ family and they all loved it. It’s got a delicious chewy base and the filling is made up of dreamy layers of creamy vanilla and tart raspberry cashew-based filling.
This delightful recipe comes from Sarah Britton of My New Roots.org. While she has opted for one 7 inch cheesecake, I used a muffin pan to create several individual sized cheesecakes.
This is a fabulous dessert for those who need to avoid processed sugar and gluten, as well as those who simply prefer to eat food in its whole, raw state. I absolutely loved this particular recipe and highly recommend it! Enjoy!!

Raw Vanilla & Raspberry ‘Cheesecakes’
Equipment
Ingredients
For the base:
- 1/2 cup 120ml (85 gm) (3 oz) raw almonds, either with skins on or blanched (pecans or walnuts will also work)
- Optional: 1/2 cup 120 ml (38 gm) (1.3 oz) flaked or shredded coconut
- 1/2 cup 120 ml (77 gm) (2.7 oz) soft pitted Medjool dates
- 1/4 teaspoon sea salt
- 1 teaspoon 5ml pure vanilla extract
- 1 tablespoon 15 ml coconut oil, melted (or as needed)
For the filling:
- 1½ cups 375ml (225gm) (8 oz) raw cashews, soaked in water for at least 5 hours or overnight
- Juice of 1 lemon two tablespoons worth (30 ml)
- 1 teaspoon 5 ml pure vanilla extract
- Optional: 1 teaspoon Savoury Yeast Flakes Nutritional Yeast – this adds a ‘cheesy’ flavour
- 1/3 cup 80 ml raw coconut oil, melted
- 1/3 cup 80 ml to taste of pure maple syrup, raw honey (solid or liquid), or agave nectar
- Water: up to 6 tablespoons 90 ml
- 1 cup 250 ml (125 gm) (4 ½ oz) raspberries, fresh or frozen (thaw completely if using frozen)
Instructions
For the Base:
- Place all the ingredients (except the coconut oil) in a food processor and pulse to chop until they are to your desired texture (process longer for a finer texture).
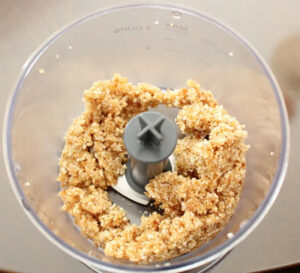
- Test the base by spooning out a small amount of mixture and rolling it in your hands. If the ingredients hold together, your base is perfect. If it’s not quite there yet, add up to a tablespoon of coconut oil until the texture is right.
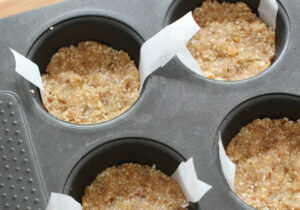
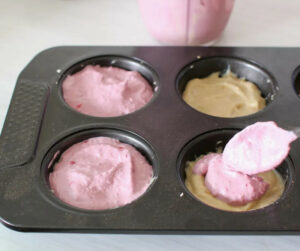
- Divide base mixture into a lightly greased 6 or 12 hole muffin tin (I made six cheesecakes as my muffin pan holes are quite deep). Otherwise, if you have doubled or tripled the recipe, pour the mixture into an 8 or 9 inch (20 or 23 cm) spring-form cake pan.
- Press the mixture firmly, making sure that the edges are well packed and that the surface is even. If making ahead, you can pop the bases into the freezer.
- Rinse your food processor well (if you’re not using a separate blender for the filling).


For the Filling:
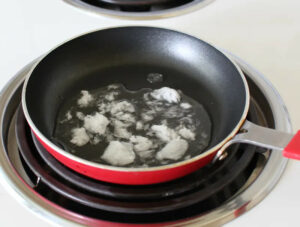
- Warm coconut oil in a small saucepan or fry-pan on low heat until melted (if you’re using solid honey, add it to the coconut oil at the same time and then whisk to combine).
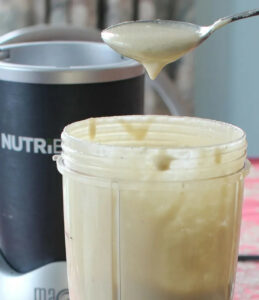
- In your most powerful food processor/blender place all filling ingredients, including the melted coconut oil (and melted honey, if using).
- Pulse initially to break down the nuts, then blend on high until very smooth (this make take a couple minutes and you may need to stop occasionally and scrape down the sides of the blender). If the mixture is too thick and it’s not blending smoothly, add a little water (up to 6 tablespoons (90 ml) may be necessary) and continue to process until smooth – the end result should be thick and gloopy (not runny). Give it a taste to check on its flavour and adjust as needed.
- Now, pour roughly two-thirds (just eyeball it) of it onto the base/s and level off the surface with the back of a spoon or a spatula. If you think your mixture is a little wet, it’s best to put the cheesecake into the freezer at this point to firm up the vanilla mixture before adding the next layer. Otherwise, if your mixture is nice and thick, you can add the next layer directly on top without chilling first.
- Add the fresh or thawed raspberries to the remaining filling and blend on high until smooth.
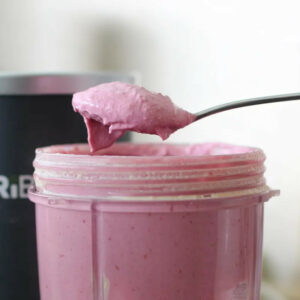
- Spoon the raspberry mixture over top of the first layer of filling and level off the tops with the back of a spoon or spatula.
- Place the pan into the freezer for at least two hours until the cheesecakes are solid.
- To serve, remove cheesecake/s from freezer at least 30 minutes prior to eating (see notes about thawing times) and remove from the muffin or cake pan (see notes about removing cakes from pans).
- Serve the individual cheesecakes on separate serving plates. Or, if you have made a full-sized cake, run a smooth, sharp knife under hot water and cut into slices.


Notes
If using a muffin pan, you can line the holes with strips of baking paper to help lever the cheesecakes out if you wish. Otherwise, I found it easier to simply slide a warmed knife around the outside of the cheesecakes and pop them out.
Adding a teaspoon of savoury yeast flakes (nutritional yeast) to your filling mixture adds a ‘cheesy’ taste as to your cheesecakes.
You need a powerful food processor or blender for mixing a smooth, creamy filling – a Vita-Mix or Nutri-bullet, or similar, is ideal.
When working with ingredients like nuts, dates and raspberries, there’s always going to be a little variance in the resulting mixture, depending upon how dry or moist the ingredients are. I’ve made this recipe several times now and each time the mixture was a little different – either wetter, thicker, or more textured, etc. The key then is to adjust intuitively – for instance, adding a touch more coconut oil or water for more moisture, adding more nuts or dates to increase thickness, etc.
It’s best if you remove the cakes while they’re still frozen, rather than waiting until they soften or they may fall apart.
The recipe suggests you take the cheesecakes out of the freezer at least 30 minutes before serving. Personally, I found the cheesecakes were still a little frozen, so I suggest transferring the mini-cheesecakes from the freezer to the fridge about 2 hours before serving, then sit them at room temperature for about 30 minutes. This allows them to become creamier and softer, while still retaining a nice chill. Ensuring they have enough defrosting time is particularly important if you’re making a large cheesecake. If you find the cheesecakes get too soft at room temperature, simply put them back into the fridge or freezer to firm up a little before eating.


Looks amazing <3 and i m a big fan of rasberry
Thanks so much! Yes, raspberry is my favourite berry.
Thanks so much this is the second good tip I’ve got from you today. I am making something similar to your post on the steak and cheese pie…only in individual muffin tin sizes….and the trick with the parchment slings to help remove the cooked pies may be perfect for helping to remove them from the pan….Thanks again!!
Glad I can help Debbie!
Thank you so much for an amazing challenge Susan
I have learnt so much from the info you posted
I had actually tried the challenge when you sent the first draft!
My kids LOVED the filling! and wanted to eat it by the spoonful when it came out of the blender!
I am terribly sorry to see you leave the daring kitchen,I used to look forward to your takes on the challenges and to your beautiful pictures
Thanks so much Sawsan – it’s been such a learning experience with TDK – I wouldn’t trade it for anything! PS: Glad the cheesecakes went down well!
Hi Susan, thanks for hosting this healthy AND delicious challenge! I was amazed at how silky the filling was. My husband also loved the result!
Your blog is absolutely gorgeous! Signing up for updates 🙂
Hi Renata! So nice that you’re signing up – be lovely to hear from you!